Step 1
Download latest release of HMG package and run HMG setup wizard for installation.
Install HMG at normal and default path for location, this is the best practice.
Installer will create with following HMG folders structure:
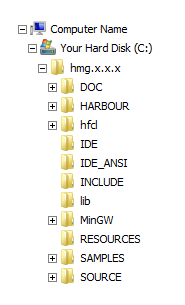
At above picture where's hmg.x.x.x means that is the hmgroot folder. Which folder name is composed by HMG version installed.
Regarding HARBOUR and MINGW sub-folders, means you haven't need to download or install neither and have been included for use with more convenience and assurance of its versions that can work with each specific HMG version.
Regarding IDE, there two version: ANSI and UNICODE and are available to use in IDE folders.
Step 2
- To start edit your source code (PRGs files) you will need to install your favorite source code editor that you can feel more comfortable counting with advanced editing features of your preference.
Notepad++ is our most favorite source editor can be easy to indicate. Because is very powerful, supports several languages and is free editor.
You can download it from https:\/\/notepad-plus-plus.org\/download\/.
You will need setup your source code editor at menubar in Tools \ Preferences \ Module Editor.
0.0.1.
You also can also change your language settings for user interface messages.
Step 3
- To begin any project, is normal require to create a specific folder to contain your project, all source and all databases files to be contained.
0.0.2.
There are two ways to open a new project by our IDE:
By menubar File and select New Project
Or simple click to New Project button
Inform your project folder and give a name. In this case we can call the project as MyApp name.
You would use long file names but beware including spaces and special character in your full file name. Because our IDE is not supports special characters and spaces but in other hand Build.bat allows working with long names files.
At this time, will be open and display two files:
Main.prg file displayed at your favorite source code editor
Main.fmg file displayed at Form Design board
Also are creating following files at your project folder:
MyApp.hbp
MyApp.hbc
MyApp.rc
You can see two files with Main name were created instead MyApp as it was defined for project name. In case you need to rename, you have two ways to do it:
1. Thru IDE
§ At menubar Project \/ Delete File and you can exclude both files by this way.
§ Now at menubar Project \/ New Module will creates a prg file with the right name given.
§ To create fmg file you click at menubar Project \/ New Form and will creates with right name
2. Outside of IDE
§ You will need to close project (not the IDE) by menubar File \/ Close Project.
§ Thru Windows Explorer you can rename these files.
§ Will be necessary to re-edict MyApp.hbp and change Main name for MyApp and save the file.
§ Now you can open MyApp project
- From now you can edit your main prg file.
In this case MyApp.prg will appears with default source code, like this. This code is used for loading a previous fmg file done. If your project you make manually (without using fmg files) you can exclude following lines: Load Window Main Main.Center Main.Activate Then you write your own code. In case your fmg was previous renamed, you will need to replace Main by the new name.
Step 4
To add a new prgs just click at menubar Project \/ New Module will creates a prg file with the name given.
In case you have others prgs files you can bring to actual project by clicking at menubar Project \/ Import File.
Step 5
By double click on your main name in module tab of Project Browser, will open automatically for file editing.
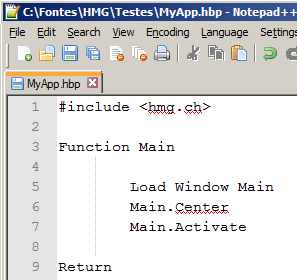
Then we can start to make MyApp demonstration. So at first line when we wish to work in GUI functions of HMG we have to include this as follows:
#include <hmg.ch>
This line is standard as GUI for all HMG modules. Unless you want build a project for console mode only, this line is not necessary.
Step 6
- Next, we'll add the Main function as follows:
Function Main()
DEFINE WINDOW Win_1 ;
AT 0,0 ;
WIDTH 400 ;
HEIGHT 200 ;
TITLE 'Hello World!' ;
MAIN
END WINDOW
ACTIVATE WINDOW Win_1
Return Nil
Step 7
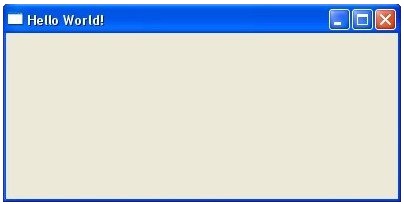
- Save your program file and then build and run your project by selecting Project \ Run from menu or simply click "Run" button.
That's all !
0.0.3.
Analysing the source code demo:
Function Main statement should it be at every HMG project.
It must be with the name of "Function Main" or "Procedure Main" and could add parenthesis for parameters separated by comma.
DEFINE WINDOW command will create the main window for the program.
Win_1 is the name of the window.
AT 0,0 indicates the window position (row=0,col=0).
WIDTH 400 means that the window will have 400 pixels width.
HEIGHT 200 means that the window will have 200 pixels height.
TITLE 'Hello World!' indicated text for window title at bar.
MAIN indicates that we are defining the main application window. Main window is required for all HMG applications.
ACTIVATE WINDOW Win_1 will show the window and start the event loop.
Return Nil will ends of function "main" return nothing.
This ";" character indicates carriage return and used to facilitate to avoid code all in the same line. Breaking down lines helps for better understanding.